General Information
Upgrade components in PRAGMATA can be found in all five sectors of the lunar station. They can be found as regular items, hidden in safes, or rewarded for simulations. Access to some components in each sector is blocked by two storyline abilities: Lime Eraser (unlocked in MPA 05) and Purification (unlocked in CP 01). No item is permanently lost. The Terra Dome is the area with the highest density of components, making it a worthwhile investment of time in the early stages. As soon as possible, purchase the Object Scanner at the Module Printer. Spend points at the Firmware Update Terminal on all three branches: Suit, Main Module, and Hacking. However, do not rush to fully invest in one of them until you have determined your playstyle, as points cannot be reset.
What are upgrade components?
They are yellow, semi-transparent cubes that flicker. They are hard to miss if you look around carefully, and very easy to pass by if you don’t.
You collect them on locations, and spend them back in the Shelter, at a terminal called the Firmware Update Terminal. This is their only purpose. There are three upgrade branches: Hugh’s Suit (more HP and protection), its Main Module (Grip gun, damage upgrades, stunning, ammo, and handling), and Hacking (Diana’s damage, weak point vulnerability time, and overheating gauge fill rate). Each branch has ten levels. After spending points, they cannot be redistributed, so think before spending.
An important point: upgrade components are not counted towards 100% sector completion. Safes, pure lunum, REM modules, modifications, storage expanders, cartridge holders, and training data are counted. Components are a separate category. However, no item is permanently lost. If you miss something, after completing the storyline in Unknown Signal mode, you will be able to return to any sector and collect everything.
Before you start searching
Two storyline abilities block access to some components in all sectors. You will unlock them both automatically as you progress through the game, but it’s essential to know about their existence so you don’t try to collect something that is not yet accessible.
Lime Eraser: unlocked in Mass Production Array 05 (Lime Recycling Center).
Purification: unlocked in Central Port 01 (Port Entrance) after the storyline event with Diana. It destroys red barricades. Several safes in the Terra Dome and Lunum Mines become accessible after acquiring this ability.
Also, as soon as possible, purchase the Object Scanner at the Module Printer. It places markers on your map for nearby resources: upgrade components, dropped lunafilaments, and repair cartridges. It doesn’t catch everything (mini-shelters are not shown), but it will save you time on endless loops through one corridor. It’s cheap. Buy it immediately.
How to detect holographic walls
A significant number of upgrade components are hidden behind holographic walls. They look like smooth, gray metal surfaces and are designed to blend in with the surroundings. When you approach, a visual flicker appears. Approach and press the interaction button to remove the wall. The Object Scanner does not always mark them. A thorough manual inspection is the only way to find them all.
Sector 1: Solar Power Plant

Source: PRAGMATA — Solar Power Plant map [wand.gg]
The Solar Power Plant introduces you to the rhythm of collecting items in the game, so don’t expect to collect everything on the first pass. Several components and safes in the Generator Hall Entrance and Energy Distribution Center are blocked by blue lunafilament. You’ll need the Lime Eraser, which you’ll only get in MPA 05.
What can be collected immediately: carefully inspect the area with the puzzle on 5 locks in the Energy Distribution Center. By going down to the dark lower level under the main road, you’ll find a safe. Take the side ladder in the same area to find another in a dead end.
In the Concourse, components are mostly in plain sight. After the boss fight at the top of the elevator, note that Emergency Exit 3 only appears after you return from the cutscene following the boss — the game teleports you to the Shelter. Return to the Concourse.
As soon as you have the Lime Eraser, return to the Generator Hall Entrance and clear the barricade at the door. And in the Energy Distribution Center, the barricade near the safe area hides both pure lunum and an additional safe.
Sector 2: Mass Production Array (MPA)
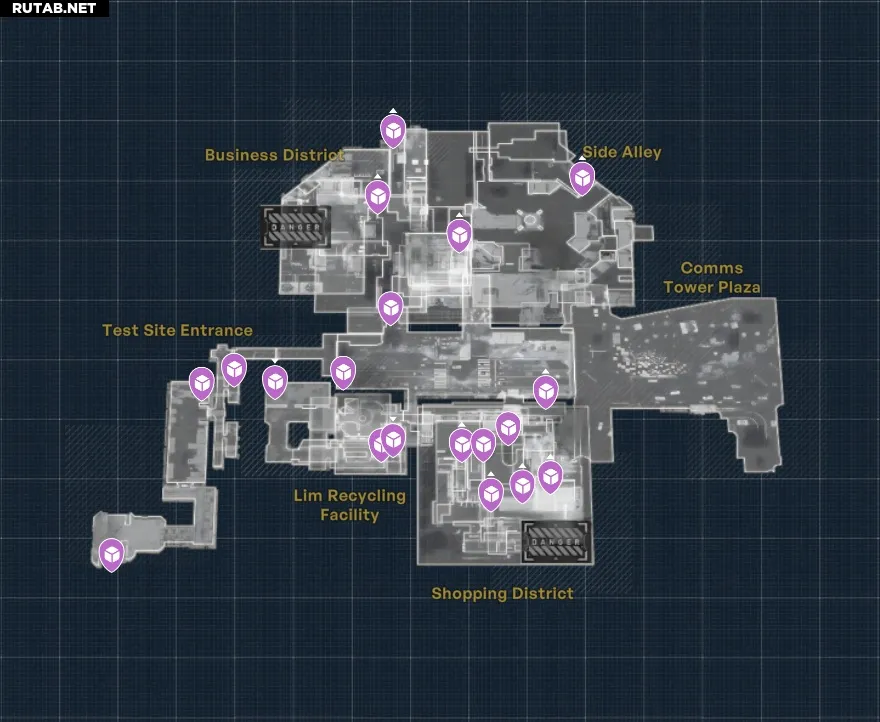
Source: PRAGMATA — Mass Production Array map [wand.gg]
MPA is where the Lime Eraser is unlocked, making it a turning point for returns. Before this moment, you can still collect a lot here.
Testing Ground Entrance: as soon as you land, turn right, then left — a component is hidden in the first open space. Near the “Testing Zone Closed” sign, check the left corner. Further, the terminal creates a passage, but if you turn right and look down, there will be a component on the wooden scaffolding below. Go down to it.
In the Trade Area, after activating the second Beacon, find a large billboard with a woman in red. A component lies right in front of it. In the Business District, after crossing the bridge near the Shelter’s “Office Space” exit, jump to the right — under the bridge, there is a hidden space with a safe. The safe on the upper platform nearby requires the Lime Eraser.
Lime Recycling Center (MPA 05) is where the Lime Eraser is unlocked. As soon as you have it:
- Return to the Solar Power Plant → Generator Hall Entrance (storage expander)
- Return to the Solar Power Plant → Energy Distribution Center (pure lunum + safe)
- Return to MPA 01 → Testing Ground Entrance (two safes inside the snack bar and Nouvelle store)
- Return to MPA 02 — Trade Area (safe on the roof ledge)
- Return to MPA 04 — Business District (safe behind the barricade at the elevator)
Sector 3: Terra Dome
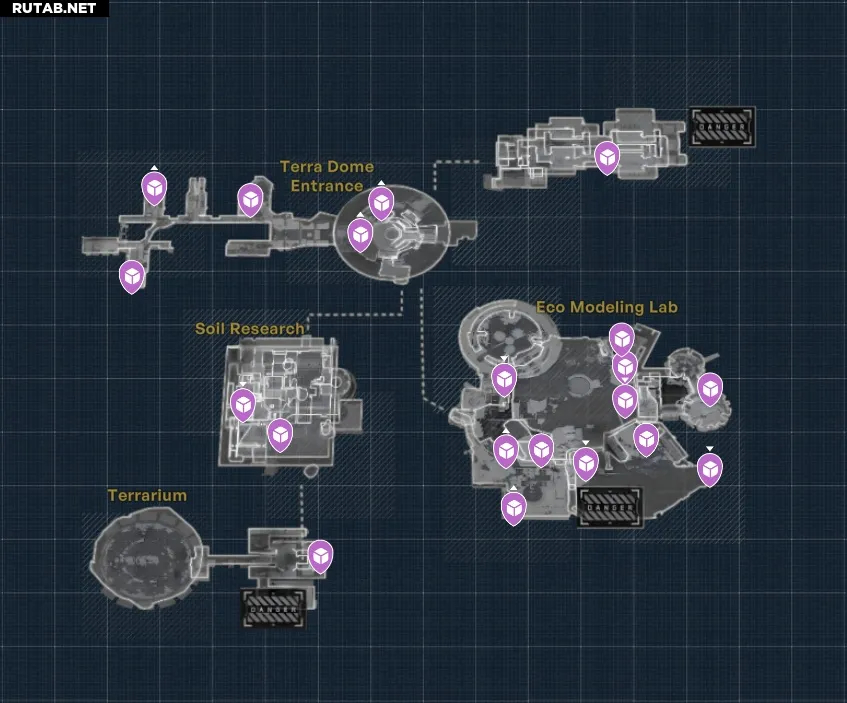
Source: PRAGMATA — Terra Dome map [wand.gg]
The Terra Dome is the sector with the highest density of upgrade components in the game. About 40 of them are scattered here, and none require abilities you don’t have at this point in the story. This makes it one of the best places to invest time in the early stages if you want to upgrade Hugh and Diana before the cost of upgrades starts to rise later.
The downside: the sector looks like a simple forest environment, but it’s not. It’s full of holographic walls, red zones, and paths that seem like dead ends but are not. The earliest components near the Terra Dome Platform are on the roofs of decommissioned trams and at the ends of docks. Most players miss them on their way to the goal.
In the Terra Dome Entrance, first go down the left path from the main elevator. Both paths (A and B) at the fork contain a safe at the end. A third safe is between the exits. Go down both paths.
In the Environmental Modeling Lab, after creating the platform on the tree, don’t rush to the door — turn right to find a holographic wall with a safe. Safes #8 and #9 in this area require the Purification ability, so note their location and return later.
Soil Survey and Terrarium continue this trend: be thorough, check every room with an elevated platform or a wall that looks too smooth and continuous. The red zone in the Terrarium rewards a storage expander along with pure lunum.
Sector 4: Lunum Mines

Source: PRAGMATA — Lunum Mines map [wand.gg]
The Lunum Mines introduce you to the Lunadigger — a major enemy patrolling the open areas. It can mostly be avoided. The sector is built vertically, so components are often above or below eye level: on top of cranes, behind second-story buildings, inside container labyrinths.
Mine Entrance: a component lies on the floor behind crystals (requires Lime Eraser). After meeting the Lunadigger, a broken ladder leads to a passage where a REM module is located — it’s hard to miss. The path blocked by crystals for Purification hides a storage expander and two safes.
Crane Control Yard: use the construction elevator on the right to go up to a modification. On the second floor of the neighboring building, there is a safe. A separate entrance behind a holographic wall on the opposite side of the same building leads to a third safe.
Warehouse: a container labyrinth near the REM module by the window requires moving containers and crawling through them. A safe in the labyrinth is only accessible from the back room. Remember the order of the containers and act methodically.
Main Excavation and Nexus Tower continue the vertical layout. Safe #13 in the excavation area requires the Purification ability.
Sector 5: Central Port

Source: PRAGMATA — Central Port map [wand.gg]
Central Port is where the Purification ability is unlocked, giving access to a large number of previously blocked areas in the sectors you’ve passed through. As soon as you have it, the list of points to return to will be:
- MPA 04 — Business District (Safe 11)
- Terra Dome 02 — Environmental Modeling Lab (Safes 8 and 9, Pure Lunum 3)
- Lunum Mines 01 — Mine Entrance (Storage Expander 1, Safes 2 and 3)
- Lunum Mines 04 — Main Excavation (Safe 13)
In Central Port itself, components and safes can be found in the Port Entrance, Research Sector, Regolith Lab, Lunafilament Lab, and Orbital Elevator. The red zone in the Regolith Lab rewards two pure lunum for one pass. The red zone in the Lunafilament Lab gives a storage expander. Safes #10 and #11 in the Orbital Elevator area are behind a holographic wall, accessible from the platform where the item for Multihack lies.
Farming with simulations
As soon as the Shelter reaches level 2, a terminal for Training Simulations will open next to the Cabin. These tests reward upgrade components, pure lunum, and Cabin coins. All your upgrades and equipment in simulations are standardized — each test is calculated for a certain base level, not your current leveled-up character. They can be repeated. Each test has a main objective and several additional ones. You don’t have to complete all objectives in one pass to get both rewards.
To unlock more tests, find Training Data collectibles in the world. There are 6 of them: 2 in the Terra Dome, Lunum Mines, and Central Port. They unlock more challenging tests with better rewards.
Frequently Asked Questions
Do upgrade components affect 100% sector completion?
- No. They are counted separately from items that affect progress: safes, pure lunum, REM modules, modifications, storage expanders, cartridge holders, and training data.
Can upgrade components be permanently missed?
- No. After completing the storyline, Unknown Signal mode will be unlocked, allowing you to return to any sector. All collectibles are preserved. Nothing becomes inaccessible.
What’s the fastest way to get more upgrade components?
- First, explore the Terra Dome — about 40 components in one sector, and all are accessible without late abilities. After that, complete Training Simulations in the Shelter. They can be repeated, and they consistently reward components for each completion.
What are Lime Eraser and Purification, and when do I get them?
- Both abilities are unlocked automatically as you progress through the story. Lime Eraser is unlocked in Mass Production Array 05 — it destroys blue crystalline barricades. Purification is unlocked in Central Port 01 and handles red barricades. After acquiring each, refer to the return lists in this guide.
I see a component, but I can’t reach it. What am I missing?
- If there’s a blue or red crystal in the area, you need the Lime Eraser or Purification respectively. If the path looks clear but is still blocked, look for a holographic wall — a smooth, gray metal surface that slightly flickers when approached. Press the interaction button on it. The Object Scanner does not always highlight them.
Is it worth prioritizing one of the branches in the Firmware Update Terminal?
- Most players consider investing in the Hacking branch to be the most valuable in the early stages — it increases the time enemies are vulnerable and Diana’s damage. Suit upgrades are responsible for survivability. Main Module has a lower priority until you’ve leveled up the other two branches, as the main damage is dealt by secondary weapons and hacking. There’s no strict order, and points cannot be reset, so in the early stages, distribute them evenly, and then invest in what suits your playstyle.